Users and Permissions Management
Manage Kubeflow Users and Permissions
Prerequisites:
Administrative access to a properly configured Konvoy cluster via
kubectl
Because a single Kubeflow user needs to interact with Kubernetes resources across their own Kubeflow Profile namespace, D2iQ recommends appropriately configured ClusterRole objects. As with all matters regarding security, we encourage you to thoroughly review permissions set by our predefined ClusterRoles in conjunction with your security team.
NB: The following tutorial assumes you have already connected an OIDC provider to your Konvoy/Kommander cluster via Konvoy’s built-in Dex integration. If you have not yet done so, please review the relevant documentation for OpenID Connect before proceeding.
Kubeflow Predefined ClusterRoles
Kaptain comes with a set of predefined Kubernetes ClusterRoles designed to simplify the workflow of administrators who manage permissions of users.
Predefined ClusterRoles for Kubeflow tenants are as follows:
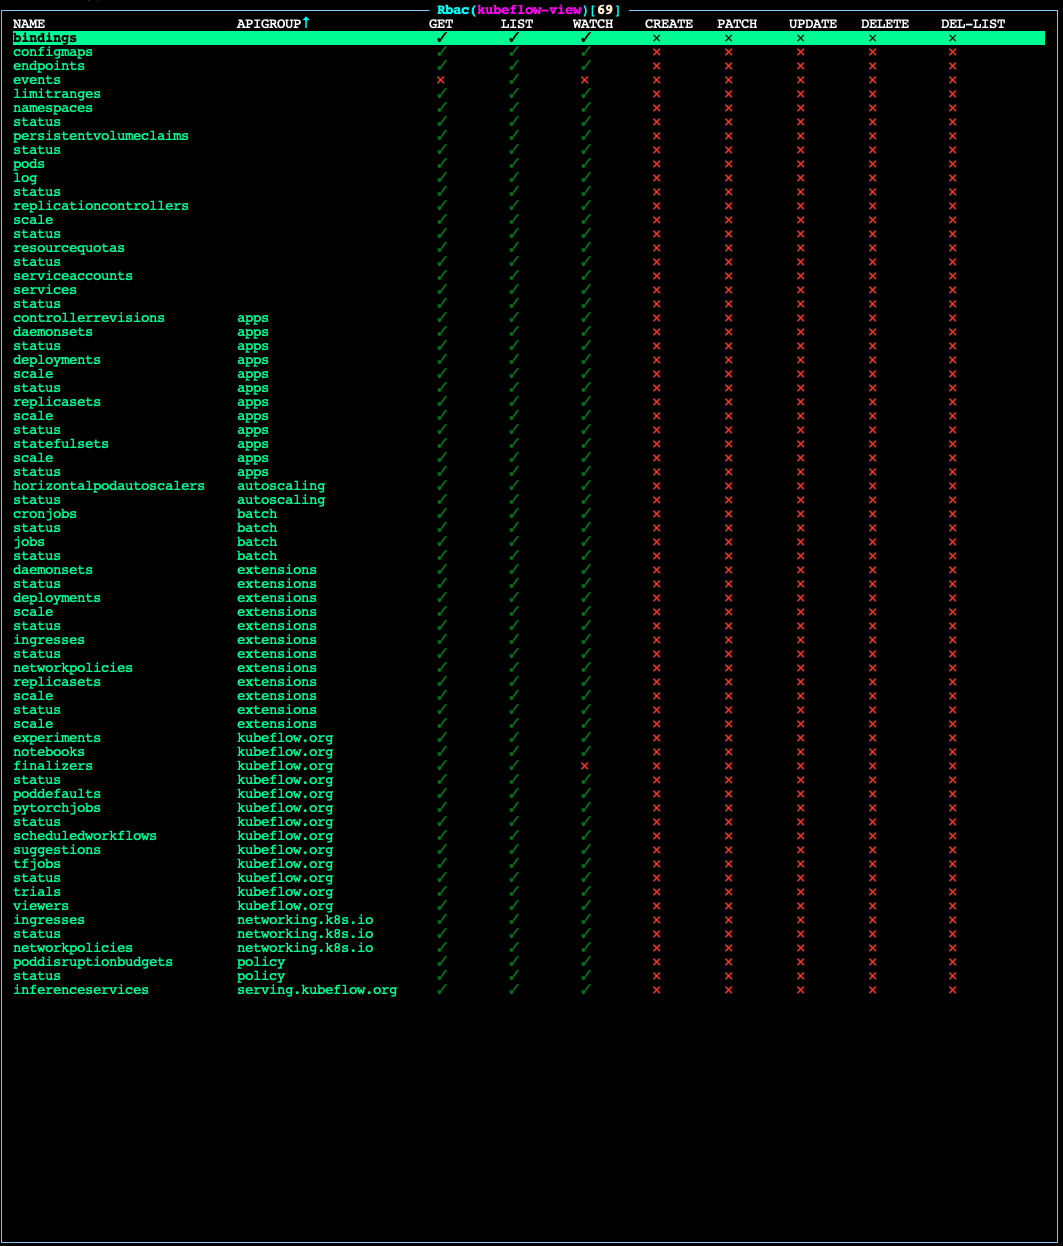
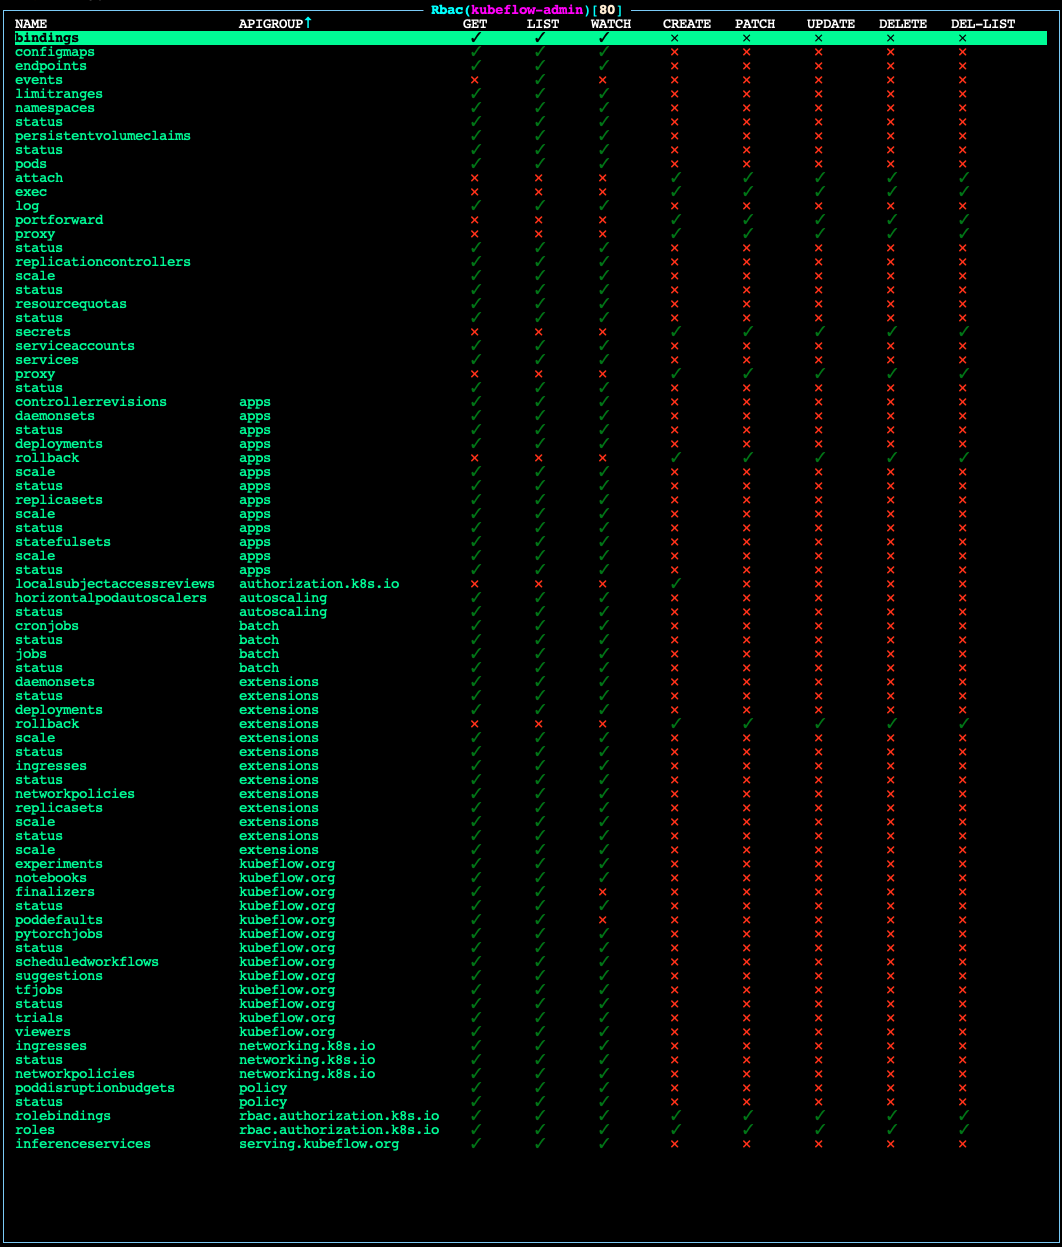
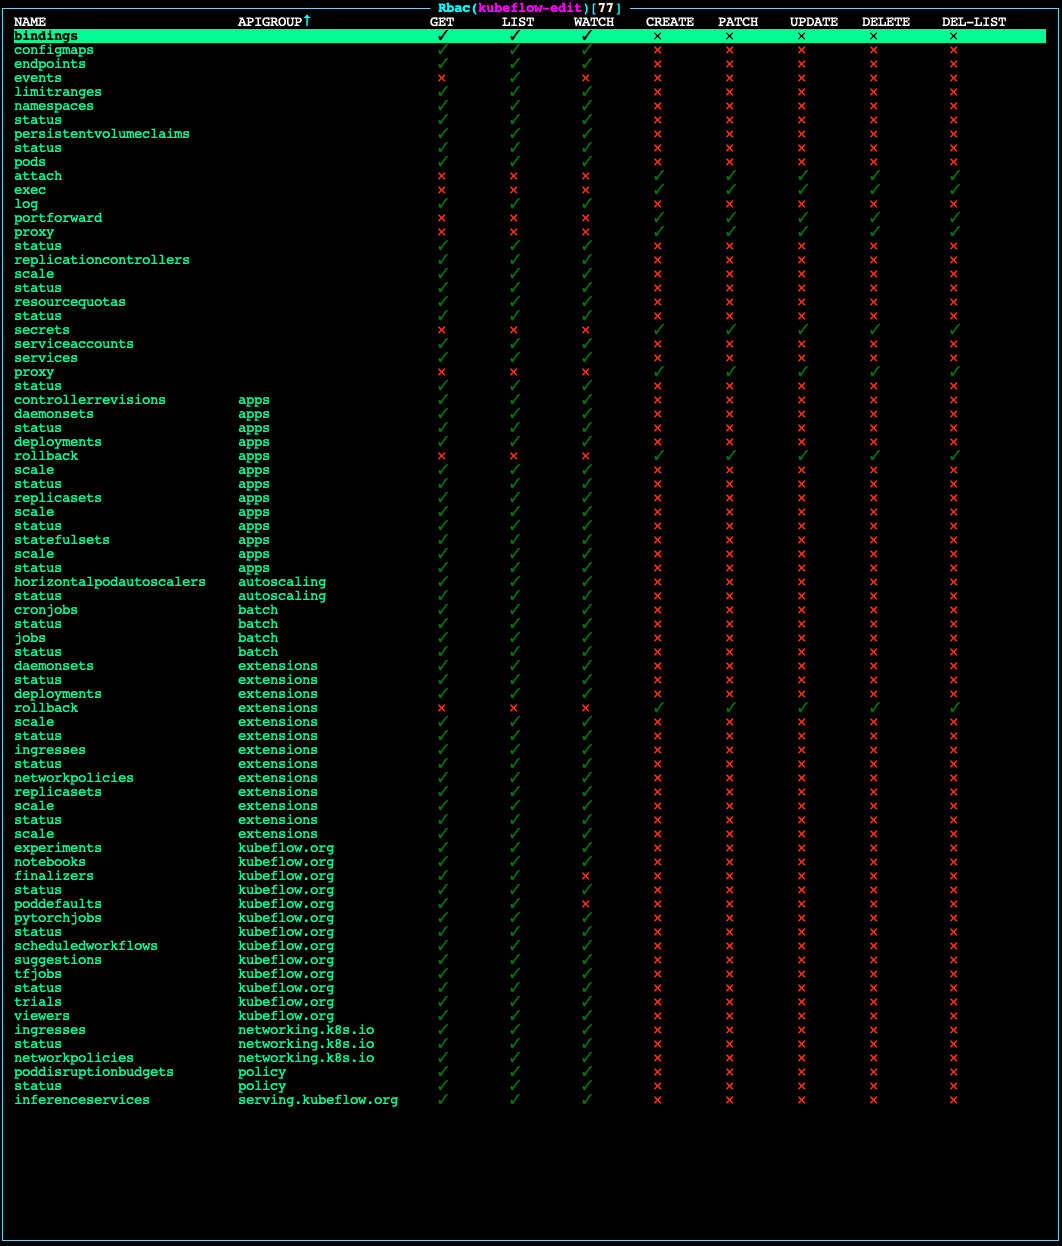
kubeflow-admin- Appropriate for administrators of the Kubeflow instance.kubeflow-edit- Appropriate for data scientists, data engineers, MLOps engineers, or other Kubeflow tenants.kubeflow-view- Appropriate for those who should have view-only access to the Kubeflow instance.
For a chart of the permissions granted to each ClusterRole, see the Permissions Charts.
Onboarding new users
Overview
Kaptain provides an abstraction called Profile which is assigned to a user and bound to a namespace along with additional resources such as namespace-scoped service accounts, RBAC RoleBindings, Istio ServiceRole and ServiceRoleBinding. Kubeflow grants users with namespace admin permissions for their namespaces.
Refer to User Authentication and Service Communication for more information on how Kaptain uses Istio and the authservice to authenticate users and facilitate encrypted communication between services.
Automatic profile creation
When an authenticated user logs into the system and visits the Kubeflow UI for the first time, they trigger a profile creation automatically, this is referred to as a “Registration Flow”. Automatic profile creation is disabled by default. To enable it, set the registrationFlow parameter to true by specifying it in the ConfigMap for Kaptain’s configuration:
core:
  registrationFlow: true
Refer to Deploy Kaptain documentation for information on how to configure Kaptain.
Manual profile creation
For a finer-grain control and per-namespace resource quota management, profiles for the new users can be created before onboarding them.
Step 1 - Create theProfileYAML manifest
In your terminal shell, run:
cat << EOF > user-profile.yaml
apiVersion: kubeflow.org/v1
kind: Profile
metadata:
  name:  "<name of profile>"
spec:
  owner:
    kind: User
    name: "<Email of user>"
  resourceQuotaSpec: {}
EOF
Step 2 - Edituser-profile.yamlwith details for the new user
Edit the metadata.name to the name of the profile you want to add.
NOTE: This name should be globally unique across your Konvoy cluster, otherwise you may overwrite another profile.
Edit the spec.owner.name to match the email address associated with the user’s OIDC account.
Step 3 - Edituser-profile.yamlto configure resource quota (optional)
Edit the spec.resourceQuotaSpec to specify user namespace resource quota. Example:
  resourceQuotaSpec:
    hard:
      cpu: "100"
      memory: 500Gi
      pods: "50"
Check ResourceQuotaSpec for the resourceQuotaSpec format.
If resource quota is enabled in a namespace, users must specify requests or limits for compute resources like cpu and memory; otherwise, the pod will be rejected by an admission controller and will not be scheduled.
It is possible to set the limits (min/max) or default resource values for pods in a namespace by defining a LimitRange policy.
With a LimitRange set for a namespace, a dedicated admission controller will set the default request/limit for pods in that namespace.
It is recommended to set a LimitRange when resource quota is enabled to enforce defaults and limits for all Pods and Containers that do not set compute resource requirements.
The following policy sets the default resource values for any pods in the namespace that do no specify resource limits:
apiVersion: v1
kind: LimitRange
metadata:
  name: cpu-mem-limit-range
spec:
  limits:
  - default:
      cpu: 800m
      memory: 512Mi
    defaultRequest:
      cpu: 500m
      memory: 256Mi
    type: Container
Step 4 - Apply user-profile.yaml to your Konvoy cluster
In your terminal shell, run:
kubectl apply -f user-profile.yamlYour output should look similar to this:
kubectl apply -f user-profile.yaml

profile.kubeflow.org/<name of profile> created
Modifying Permissions of existing Users
Adding Permissions for a Kubeflow Administrator
Step 1 - Create theClusterRoleBindingYAML manifest
In your terminal shell, run:
cat << EOF > add-kubeflow-admin.yaml
apiVersion: rbac.authorization.k8s.io/v1
kind: ClusterRoleBinding
metadata:
  name: "<name of user>"
roleRef:
  apiGroup: rbac.authorization.k8s.io
  kind: ClusterRole
  name: kubeflow-admin
subjects:
- apiGroup: rbac.authorization.k8s.io
  kind: User
  name: "<Email of user>"
EOF
Step 2 - Editadd-kubeflow-admin.yamlwith details for the new user
Edit the metadata.name to the name of the user you want to add.
NOTE: This name should be globally unique across your Konvoy cluster, otherwise you may overwrite another user's permissions.
Edit the subjects.apiGroup.name to match the email address associated with the user’s OIDC account.
Step 3 - Applyadd-kubeflow-admin.yamlto your Konvoy cluster
In your terminal shell, run:
kubectl apply -f add-kubeflow-admin.yamlYour output should look similar to this:
kubectl apply -f add-kubeflow-admin.yaml

clusterrolebinding.rbac.authorization.k8s.io/<name of user> created
Adding Permissions for a Kubeflow User
Step 1 - Create theClusterRoleBindingYAML manifest
In your terminal shell, run:
cat << EOF > add-kubeflow-user.yaml
apiVersion: rbac.authorization.k8s.io/v1
kind: ClusterRoleBinding
metadata:
  name: "<name of user>"
roleRef:
  apiGroup: rbac.authorization.k8s.io
  kind: ClusterRole
  name: kubeflow-edit
subjects:
- apiGroup: rbac.authorization.k8s.io
  kind: User
  name: "<Email of user>"
EOF
Step 2 - Editadd-kubeflow-user.yamlwith details for the new user
Edit the metadata.name to the name of the user you want to add.
NOTE: This name should be globally unique across your Konvoy cluster, otherwise you may overwrite another user's permissions.
Edit subjects.apiGroup.name to match the email address associated with the user’s OIDC account.
Step 3 - Applyadd-kubeflow-user.yamlto your Konvoy cluster
In your terminal shell, run:
kubectl apply -f add-kubeflow-user.yamlYour output should look similar to this:
kubectl apply -f add-kubeflow-user.yaml

clusterrolebinding.rbac.authorization.k8s.io/<name of user> created
Permissions Charts
kubeflow-adminpermissions
kubeflow-editpermissions
kubeflow-viewpermissions