
Hyperparameter Tuning
All tutorials in Jupyter Notebook format are available for download. You can either download them to a local computer and upload to the running Jupyter Notebook or run the following command from a Jupyter Notebook Terminal running in your Kaptain installation:
curl -L https://downloads.d2iq.com/kaptain/d2iq-tutorials-2.2.0.tar.gz | tar xzThese notebook tutorials have been built for and tested on D2iQ's Kaptain. Without the requisite Kubernetes operators and custom Docker images, these notebooks will likely not work.
Hyperparameter Tuning with Katib
Introduction
Hyperparameter tuning is the process of optimizing a model’s hyperparameter values in order to maximize the predictive quality of the model. Examples of such hyperparameters are the learning rate, neural architecture depth (layers) and width (nodes), epochs, batch size, dropout rate, and activation functions. These are the parameters that are set prior to training; unlike the model parameters (weights and biases), these do not change during the process of training the model.
Katib automates the process of hyperparameter tuning by running a pre-configured number of training jobs (known as trials) in parallel. Each trial evaluates a different set of hyperparameter configurations. Within each experiment it automatically adjusts the hyperparameters to find their optimal values with regard to the objective function, which is typically the model’s metric (e.g. accuracy, AUC, F1, precision). An experiment therefore consists of an objective, a search space for the hyperparameters, and a search algorithm. At the end of the experiment, Katib outputs the optimized values, which are also known as suggestions.
NOTE
Three Data Sets
Whereas it is common to have training and test data sets in traditional (supervised) machine learning, in deep learning (esp. when combined with hyperparameter tuning), it is recommended to have a three-way split: training, validation (a.k.a. as development), and test. The training data set is, as always, to learn parameters (weights and biases) from data. The test data set is also known as the hold-out set and its sole purpose is to check the model's hypothesis of parameter values in terms of how well it generalizes to data it has never come across. The point of the validation data set is to cross-validate the model and tweak the hyperparameters. Since information from this data set is used to adjust the model, it is not an objective test of the model's generalizability. It is not unlike a teacher checking up on students:
The training data set is the text book to learn the theory from
The validation data set comprises the exercises to practice the theory
The test data set is exam to assess the degree of learning vs lookup
What You Will Learn
This notebook shows how you can create and configure an Experiment for both TensorFlow and PyTorch training jobs. In terms of Kubernetes, such an experiment is a custom resource handled by the Katib operator.
What You Need
A Docker image with either a TensorFlow or PyTorch model that accepts hyperparameters as arguments. Click on the links to see such models.
How to Specify Hyperparameters in Your Models
In order for Katib to be able to tweak hyperparameters it needs to know what these are called in the model. Beyond that, the model must specify these hyperparameters either as regular (command line) parameters or as environment variables. Since the model needs to be containerized, any command line parameters or environment variables must to be passed to the container that holds your model. By far the most common and also the recommended way is to use command line parameters that are captured with argparse or similar; the trainer (function) then uses their values internally.
How to Expose Model Metrics as Objective Functions
By default, Katib collects metrics from the standard output of a job container by using a sidecar container. In order to make the metrics available to Katib, they must be logged to stdout in the key=value format. The job output will be redirected to /var/log/katib/metrics.log file. This means that the objective function (for Katib) must match the metric’s key in the models output. It is therefore possible to define custom model metrics for your use case.
NOTE
Sidecars
In the sidecar (a.k.a. sidekick or decomposition) pattern, if you are not already familiar with it, a secondary (sidecar) container is attached to the primary workload inside a pod in Kubernetes. In many cases, pods run a single container, but peripheral services, such as networking services, monitoring, and logging, are required in all applications and services. With sidecars, there is no need to re-implement basic but secondary tasks in each service or application. The sidecar has the same lifecycle as the primary application and it has access to the same resources. The sidecar is, however, isolated from the main container, which means it does not have to be implemented in the same technology. This means it can easily be reused across various workloads.
Katib does not care whether you use TensorFlow, PyTorch, MXNet, or any other framework for that matter. All it needs to do its job is a (parameterized) trainer container and the logs to grab the model's metrics from.
How to Create Experiments
Note that you typically use (YAML) resource definitions for Kubernetes from the command line, but you can do everything from a notebook, too! Of course, if you are more familiar or comfortable with kubectl and the command line, feel free to use a local CLI or the embedded terminals from the Jupyter Lab launch screen.
TF_EXPERIMENT_FILE = "katib-tfjob-experiment.yaml"
PYTORCH_EXPERIMENT_FILE = "katib-pytorchjob-experiment.yaml"
Set the following constants depending on whether you want to use GPUs or a custom image.
GPUS = 1  # set to 0 if the experiment should not use GPUs
PARALLEL_TRIAL_COUNT = 3
TOTAL_TRIAL_COUNT = 9
Make the defined constants available as shell environment variables. They parameterize the Experiment manifests below.
%env GPUS $GPUS
%env TF_EXPERIMENT_FILE $TF_EXPERIMENT_FILE
%env PYTORCH_EXPERIMENT_FILE $PYTORCH_EXPERIMENT_FILE
%env PARALLEL_TRIAL_COUNT $PARALLEL_TRIAL_COUNT
%env TOTAL_TRIAL_COUNT $TOTAL_TRIAL_COUNTenv: GPUS=1
env: TF_EXPERIMENT_FILE=katib-tfjob-experiment.yaml
env: PYTORCH_EXPERIMENT_FILE=katib-pytorchjob-experiment.yaml
env: PARALLEL_TRIAL_COUNT=3
env: TOTAL_TRIAL_COUNT=9Define a helper function to capture output from a cell that usually looks like some-resource created, using %%capture:
import re

from IPython.utils.capture import CapturedIO


def get_resource(captured_io: CapturedIO) -> str:
    """
    Gets a resource name from `kubectl apply -f <configuration.yaml>`.

    :param str captured_io: Output captured by using `%%capture` cell magic
    :return: Name of the Kubernetes resource
    :rtype: str
    :raises Exception: if the resource could not be created
    """
    out = captured_io.stdout
    matches = re.search(r"^([^/]+/)?(.+)\s+created", out)
    if matches is not None:
        return matches.group(2)
    else:
        raise Exception(
            f"Cannot get resource as its creation failed: {out}. It may already exist."
        )
TensorFlow: a TFJob Experiment
The TFJob definition for this example is based on the MNIST with TensorFlow notebook. The model accepts several arguments:
--batch-size--buffer-size--epochs--steps--learning-rate--momentum
For the experiment, focus on the learning rate and momentum of the SGD algorithm. You can add the other hyperparameters in a similar manner. Please note that discrete values (e.g. epochs) and categorical values (e.g. optimization algorithms) are supported, too.
The following YAML file describes an Experiment object:
%env IMAGE mesosphere/kubeflow:2.2.0-mnist-tensorflow-2.9.1-gpu%%bash
cat <<END > $TF_EXPERIMENT_FILE
apiVersion: "kubeflow.org/v1beta1"
kind: Experiment
metadata:
name: katib-tfjob-experiment
spec:
parallelTrialCount: $PARALLEL_TRIAL_COUNT
maxTrialCount: $TOTAL_TRIAL_COUNT
maxFailedTrialCount: 3
objective:
type: maximize
goal: 0.99
objectiveMetricName: accuracy
algorithm:
algorithmName: random
parameters:
- name: learning_rate
parameterType: double
feasibleSpace:
min: "0.3"
max: "0.4"
- name: momentum
parameterType: double
feasibleSpace:
min: "0.6"
max: "0.7"
resumePolicy: Never
trialTemplate:
primaryContainerName: tensorflow
trialParameters:
- name: learningRate
description: Learning rate for the training model
reference: learning_rate
- name: momentum
description: Momentum for the training model
reference: momentum
trialSpec:
apiVersion: "kubeflow.org/v1"
kind: TFJob
spec:
tfReplicaSpecs:
Worker:
replicas: 2
restartPolicy: OnFailure
template:
metadata:
annotations:
sidecar.istio.io/inject: "false"
spec:
containers:
- name: tensorflow
image: ${IMAGE}
imagePullPolicy: Always
command: ["python", "-u", "/mnist.py"]
args:
- "--learning-rate=\${trialParameters.learningRate}"
- "--momentum=\${trialParameters.momentum}"
resources:
limits:
cpu: 1
memory: 3G
nvidia.com/gpu: $GPUS
ENDPlease note that the Docker image that contains the model has to be set for the trialTemplate configuration. This experiment will create 9 trials with different sets of hyperparameter values passed to each training job. It uses a random search to maximize the accuracy on the test data set.
A comment has been added where you can change the Docker image. The one listed should work, but you may want to try it with your own container registry.
NOTE: Performing hyperparameter tuning on data that is split two ways only is not ideal. For this demonstration it is enough, as you do not check the accuracy of the tuned model on a separate hold-out data set. If you wanted to do that yourself, you could do it as follows:
Split the data three ways
Evaluate the model on both the validation and test data sets
Add the model evaluation metric for the test data set as an entry in
additionalMetricNames, which may contain multiple metrics of interestLet Katib find the best hyperparameter values based on the validation data set (i.e.
objectiveMetricName)Extract the corresponding model evaluation metric for the test data set from the results
The Experiment specification has the following sections to configure experiments:
spec.parameterscontains the list of hyperparameters that are used to tune the modelspec.objectivedefines the metric to optimizespec.algorithmdefines which search algorithm to use for the tuning process
Many more configuration options exist, but they are too numerous to go through here. Please have a look at the official documentation for more details.
PyTorch: a PyTorchJob experiment
This example is based on the MNIST with PyTorch notebook. It accepts the following parameters relevant to training the model:
--batch-size--epochs--lr(i.e. the learning rate)--gamma
For the experiment, find the optimal learning rate in the range of [0.7, 1.0] with regard to the accuracy on the test data set. This is logged as accuracy=<value>, as can be seen in the original notebook for distributed training. Run up to 9 trials with three such trials in parallel. Again, use a random search:
%env IMAGE mesosphere/kubeflow:2.2.0-mnist-pytorch-1.11.0-gpu%%bash
cat <<END > $PYTORCH_EXPERIMENT_FILE
apiVersion: "kubeflow.org/v1beta1"
kind: Experiment
metadata:
name: katib-pytorchjob-experiment
spec:
parallelTrialCount: $PARALLEL_TRIAL_COUNT
maxTrialCount: $TOTAL_TRIAL_COUNT
maxFailedTrialCount: 3
objective:
type: maximize
goal: 0.99
objectiveMetricName: accuracy
algorithm:
algorithmName: random
parameters:
- name: lr
parameterType: double
feasibleSpace:
min: "0.7"
max: "1.0"
resumePolicy: Never
trialTemplate:
primaryContainerName: pytorch
trialParameters:
- name: learningRate
description: Learning rate for the training model
reference: lr
trialSpec:
apiVersion: "kubeflow.org/v1"
kind: PyTorchJob
spec:
pytorchReplicaSpecs:
Master:
replicas: 1
restartPolicy: OnFailure
template:
metadata:
annotations:
sidecar.istio.io/inject: "false"
spec:
containers:
- name: pytorch
image: ${IMAGE}
imagePullPolicy: Always
command: ["python", "-u", "/mnist.py"]
args:
- "--epochs=5"
- "--batch-size=1024"
- "--lr=\${trialParameters.learningRate}"
resources:
limits:
nvidia.com/gpu: $GPUS
requests:
cpu: 1
memory: 1G
Worker:
replicas: 2
restartPolicy: OnFailure
template:
metadata:
annotations:
sidecar.istio.io/inject: "false"
spec:
containers:
- name: pytorch
image: ${IMAGE}
imagePullPolicy: Always
args:
- "--epochs=5"
- "--batch-size=1024"
- "--lr=\${trialParameters.learningRate}"
resources:
limits:
nvidia.com/gpu: $GPUS
requests:
cpu: 1
memory: 1G
ENDPlease note the subtle differences in the trialTemplate: the kind is either TFJob or PyTorchJob and the Docker images are obviously different.
NOTE: After deploying an Experiment resource, Katib deploys a Suggestion which results in a Pod creation. The Suggestion keeps track of all Trials and parameters suggested by the algorithm. The underlying jobs are deleted after finishing but the Suggestion pod keeps running in case the experiment needs to be resumed. However, if it is not expected to be resumed, it's possible to clean up the Suggestion pod after the completion of the experiment by setting resumePolicy: Never in Experiment YAML file.
Run and Monitor Experiments
You can either execute these commands on your local machine with kubectl or you can run them from the notebook. If you do run these locally, you cannot rely on cell magic, so you have to manually copy-paste the experiment name wherever you see $EXPERIMENT. If you intend to run the following command locally, you have to set the user namespace for all subsequent commands:
kubectl config set-context --current --namespace=<insert-namespace>Please change the namespace to whatever has been set up by your administrator.
Pick one of the following depending on which framework you want to use.
%env EXPERIMENT_FILE $PYTORCH_EXPERIMENT_FILE%env EXPERIMENT_FILE $TF_EXPERIMENT_FILETo submit the experiment, execute:
%%capture kubectl_output --no-stderr
%%sh
kubectl apply -f "${EXPERIMENT_FILE}"
The cell magic grabs the output of the kubectl command and stores it in an object named kubectl_output:
%env EXPERIMENT {get_resource(kubectl_output)}To see the status, run:
%%sh
kubectl describe experiment.kubeflow.org $EXPERIMENT
To see experiment suggestions:
%%sh
kubectl describe suggestions.kubeflow.org $EXPERIMENT
To get the list of created trials, use the following command:
%%sh
kubectl get trials.kubeflow.org -l katib.kubeflow.org/experiment=$EXPERIMENTNAME TYPE STATUS AGE
katib-pytorchjob-experiment-62b9lr7k Created True 2s
katib-pytorchjob-experiment-qcl4jkc6 Created True 2s
katib-pytorchjob-experiment-vnzgj7q6 Created True 2sTo fetch the logs of a particular trial, use the following command:
%%sh
kubectl logs -l job-name=<trial-name> --all-containers --prefix=true
After the experiment is completed, use describe to get the best trial results:
%%sh
kubectl describe experiment.kubeflow.org $EXPERIMENT
The relevant section of the output looks like this:
Name: katib-pytorchjob-experiment
...
Status:
  ...
  Current Optimal Trial:
    Best Trial Name:  katib-pytorchjob-experiment-jv4sc9q7
    Observation:
      Metrics:
        Name:   accuracy
        Value:  0.9902
    Parameter Assignments:
      Name:    --lr
      Value:   0.5512569257804198
  ...
  Trials:            6
  Trials Succeeded:  6
...
If an Experiment needs to be deleted, including deleting it from the “Experiments (AutoML)” page:
%%sh
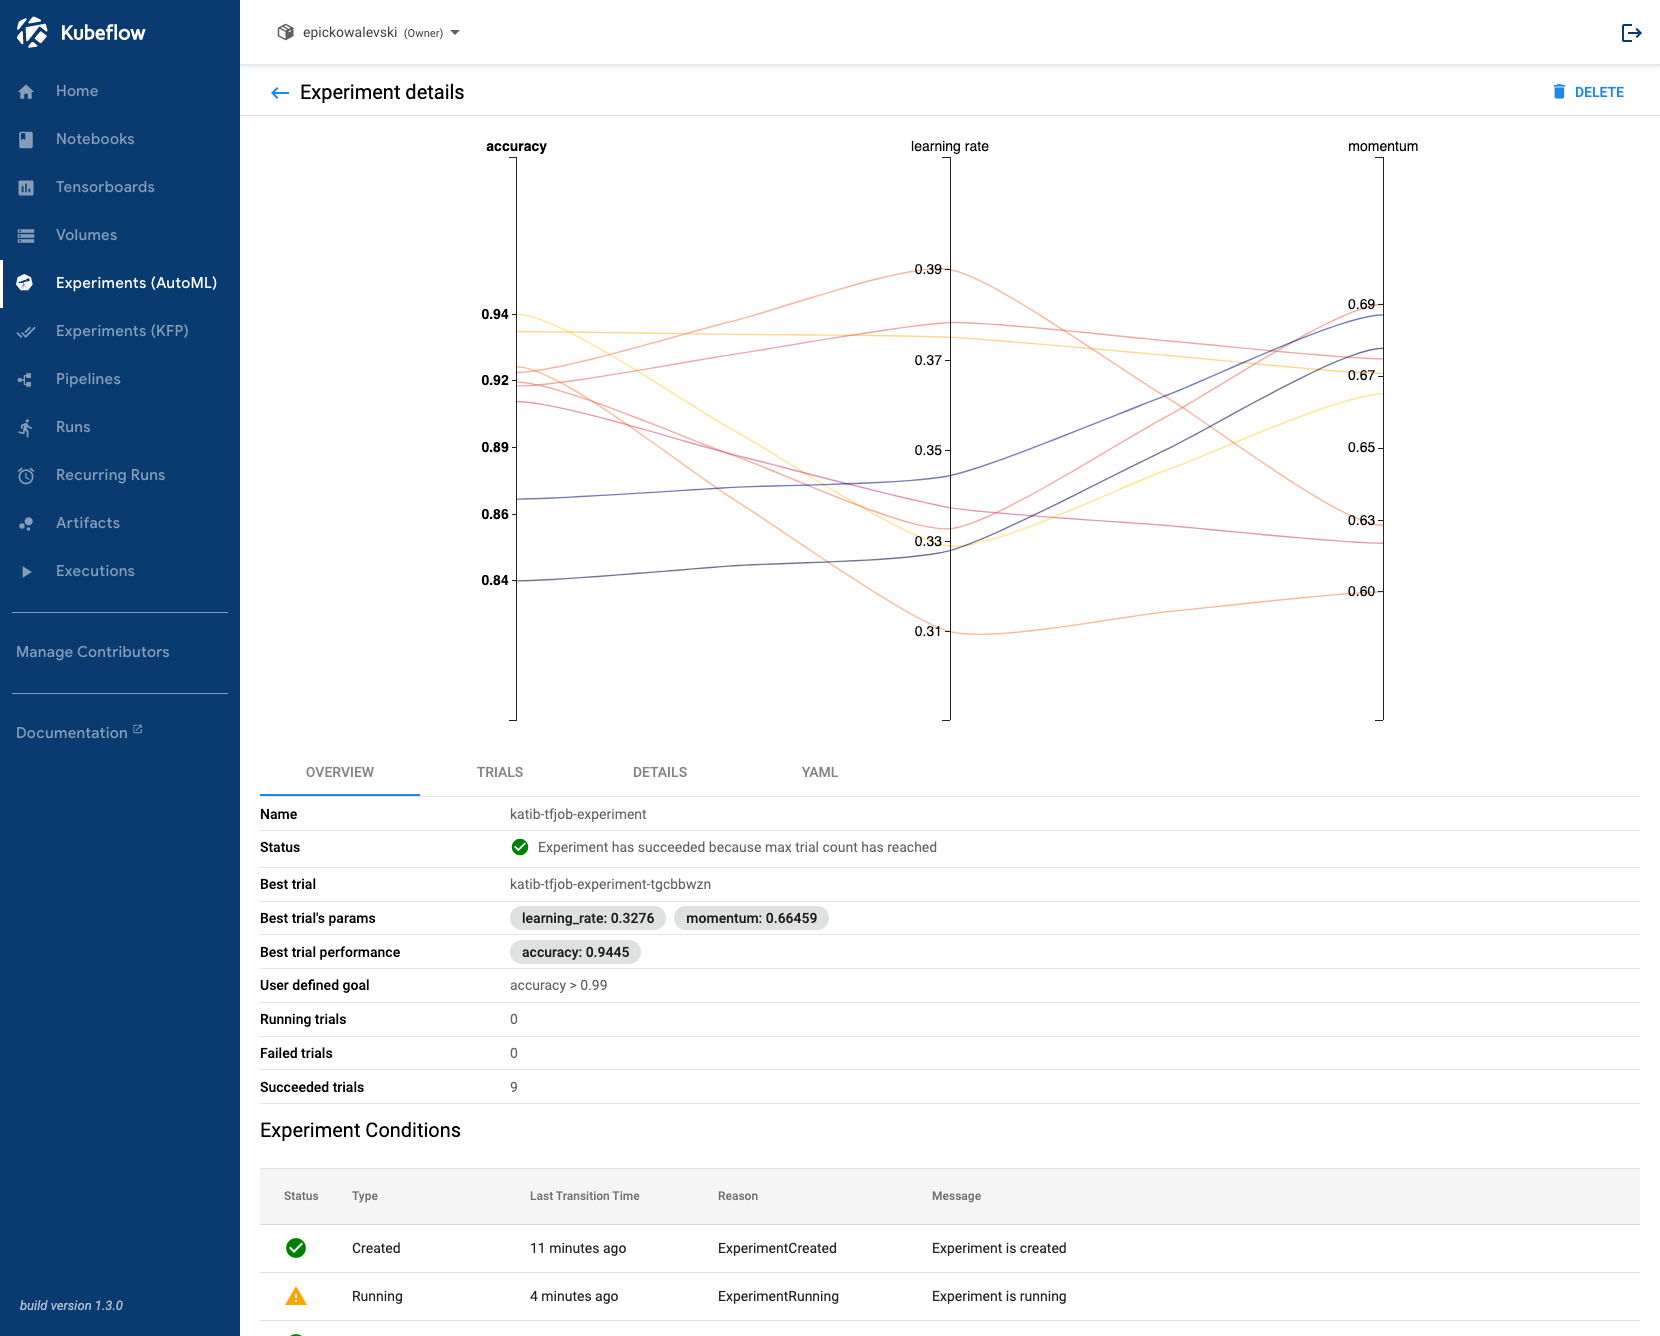
kubectl delete experiments.kubeflow.org $EXPERIMENT Katib UI
So far, you have created and submitted experiments via the command line or from within Jupyter notebooks. Katib provides a user interface which allows you to create, configure, monitor, and delete experiments from a browser. The Katib UI can be launched from Kubeflow’s central dashboard. Select “Experiments (AutoML)” in the navigation menu.

To see detailed information, such as trial results, metrics, and a plot, click on the experiment itself.
This tutorial includes code from the MinIO Project (“MinIO”), which is © 2014-2022 MinIO, Inc. MinIO is made available subject to the terms and conditions of the Apache Software Foundation, Apache License V2.0. The complete source code for the version of MinIO packaged with Kaptain 2.2.0 is available at this URL:
For a full list of attributed 3rd party software, see http://d2iq.com/legal/3rd